


Capturing memorable moments in your favorite games can be both fun and essential for sharing your gaming achievements or funny mishaps. Steam offers a straightforward way to take screenshots during gameplay, but knowing how to access, customize, and organize these images can enhance your overall experience. Whether you’re on Windows, Mac, Linux, or even Steam Deck, this guide walks you through every step to help you become a screenshot pro.
What You Need to Know Before You Start
- To take a quick snapshot in a Steam game, simply press the F12 key on your keyboard.
- All your captured images are stored in Steam’s screenshot gallery, which you can access at any time.
- You have the flexibility to change the default hotkey, customize storage options, and view your images both within Steam and directly through your file explorer.
Understanding these basics ensures you’re ready to efficiently capture and manage your gaming visuals.
How to Take Screenshots in Steam
Pressing F12 activates Steam’s built-in overlay feature, which allows you to snap an in-game screenshot instantly. This hotkey works across most operating systems, including Linux and Mac; however, on a MacBook Pro with a Touch Bar, you might need to press the Function (Fn) key along with F12 to trigger the capture.
If you’re using a Steam Deck, the process is slightly different: press the Steam button along with the Right Bumper (R1). This dedicated control makes capturing gameplay quick and seamless on portable devices.
Once you press the designated key, Steam automatically saves the screenshot to your local storage. After exiting the game, a confirmation popup will appear, displaying all the images you’ve captured during that session. From here, you can view, upload, or delete your screenshots directly within Steam.
For more detailed instructions, you can visit official sources such as PC Gamer’s guide or Tom’s Guide to explore different methods and troubleshooting tips.
Viewing and Managing Your Screenshots
Accessing your captured images is simple. Inside Steam, click View in the top menu, then select Screenshots from the dropdown. This opens your screenshot gallery, where you can browse through all your captures. You can upload images directly to the Steam Community by clicking the Upload button, adding captions, and selecting privacy settings like public or private.
To delete an unwanted screenshot, select it and click the trash icon. If you prefer viewing your images outside of Steam, click the Show On Disk icon (folder icon), which opens the folder where Steam stores your images on your computer.
On Steam Deck, navigate to the Media section after pressing the Steam button to view your saved screenshots. This makes managing your images convenient, whether you’re on a PC or portable device.
If you want to locate your screenshots manually, you can find them in your file system. On Windows, navigate to:
`C:Program Files (x86)Steamuserdata[SteamID]760remote[AppID]screenshots`
Replace `[SteamID]` and `[AppID]` with your own user and game IDs. On Mac, the path is:
`Users[Your Username]LibraryApplication SupportSteamuserdata[SteamID]remote[AppID]`
To identify your Steam ID, visit your profile page and click Edit Profile; your ID appears under the “Custom URL” section. You can also find the game’s App ID by right-clicking the game in your library, selecting Properties, then Updates.
Customizing Your Screenshot Settings
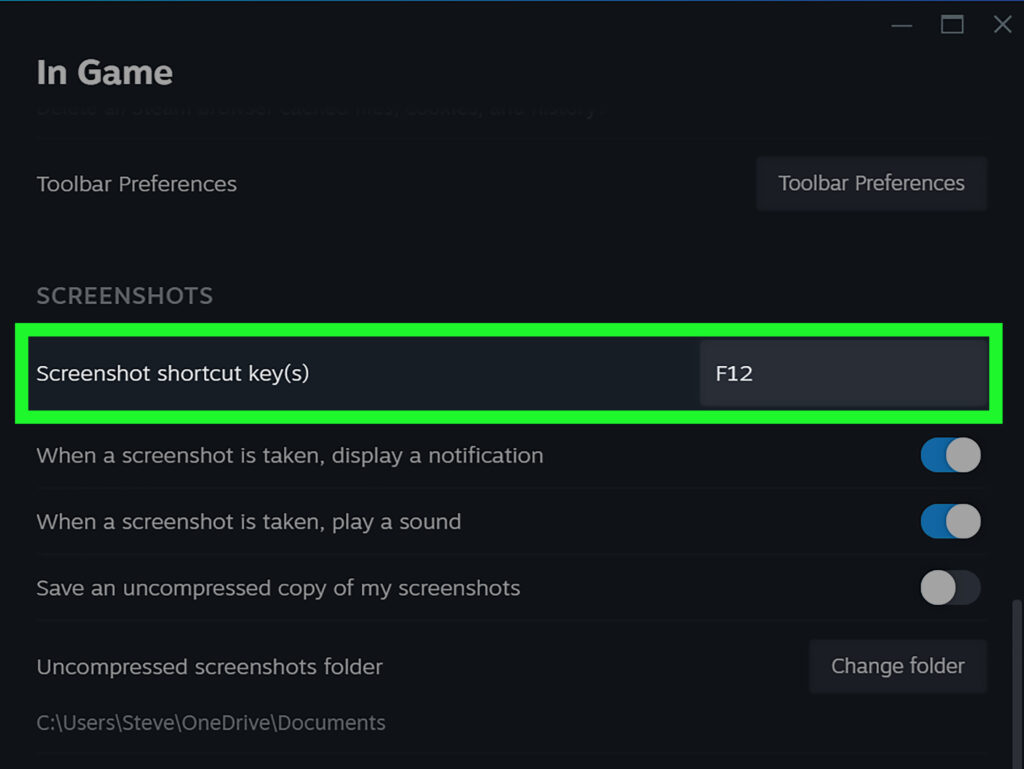
Steam allows you to personalize your screenshot experience. To change the hotkey, go to the Screenshots menu and click Settings or the gear icon. Here, you’ll see the Screenshot shortcut key(s)) section—click the field and press the new key combination you wish to assign.
You can also choose whether to save uncompressed screenshots for better quality or specify a dedicated folder for storing your images. For a more tailored workflow, consider assigning a hotkey that fits your gaming style or keyboard layout to streamline capturing moments in the heat of gameplay.
Additional Tips and Resources
For a deeper understanding of your options, review the official documentation on managing your screenshots through Steam’s support page. Additionally, mastering your collection can be enhanced by exploring how to unlock different image types or optimizing your staffing strategy for game development projects—especially if you’re creating content or modding games.
If you’re interested in expanding your game development skills or collaborating with professional studios, it’s worthwhile to look into the benefits of working with experienced partners. For example, discover how engaging with companies like Double Coconut can add value to your projects by visiting this partnership guide.
In your gaming journey, understanding how to unlock various screenshot formats can also be beneficial. Find out more about this process by exploring how to unlock types in Game Dev Story. If you’re planning to hire or build a team for game development, a solid staffing strategy can make all the difference; learn more about this in this staffing guide.
Final Thoughts
Capturing your gaming adventures with Steam is quick and easy once you understand the process. Whether you’re on a desktop, laptop, or Steam Deck, customizing your screenshot hotkeys, viewing your captures, and organizing your library can elevate your gaming experience. Practice these steps, explore your settings, and share your favorite moments with friends or the community to fully enjoy everything Steam screenshots have to offer.